1. Introduction: Your DIY Project Starts Here
So, you’ve acquired a German-style keg and have big plans for it—whether it’s becoming the boiler for a home distillery, a new brew kettle, or another awesome DIY project. Before you can get to the fun part, you have to tackle the first and most crucial step: removing the internal spear. While similar to other kegs, the German-style spear often has a different retaining ring system that can be puzzling. The good news? You don’t need expensive, specialized tools. With a bit of patience and the right technique, you can get it done with a couple of screwdrivers and a trusty pair of channel locks. Let’s dive in.
2. The Simple Tools You’ll Need
Forget complicated keg tools. This job is all about leverage and finesse with items you likely already have in your toolbox. Before you start, make sure you have the following ready.
- A Large Pair of Channel Locks: This is your primary tool for grip and leverage. A large pair (12 inches or more) will give you the torque needed to turn a stubborn spear that’s been sealed for years.
- Two Screwdrivers: A heavy-duty, large flathead screwdriver will be used for prying, while a second, smaller screwdriver can be used for detailed manipulation of the retaining ring.
- Safety Gear: This is non-negotiable. Grab a pair of safety glasses to protect your eyes from spray and flying debris, and a pair of work gloves to protect your hands.


3. Safety First: The Crucial De-pressurizing Step
Never attempt to remove a spear from a pressurized keg. Even a supposedly “empty” keg can contain enough residual CO2 to turn the heavy metal spear into a dangerous projectile.
Continue holding the valve down until the hissing sound stops completely. Press it a few more times to be absolutely certain all pressure has been released.
- Put on your safety glasses.
- With the keg upright, place the tip of your large flathead screwdriver in the center of the keg fitting over the small steel ball.
- Point the top of the keg away from your face and body.
- Firmly press the screwdriver down to depress the ball valve. You will hear a hiss of escaping gas and may get a spray of old, stale beer—this is normal.
- Continue holding the valve down until the hissing sound stops completely. Press it a few more times to be absolutely certain all pressure has been released.


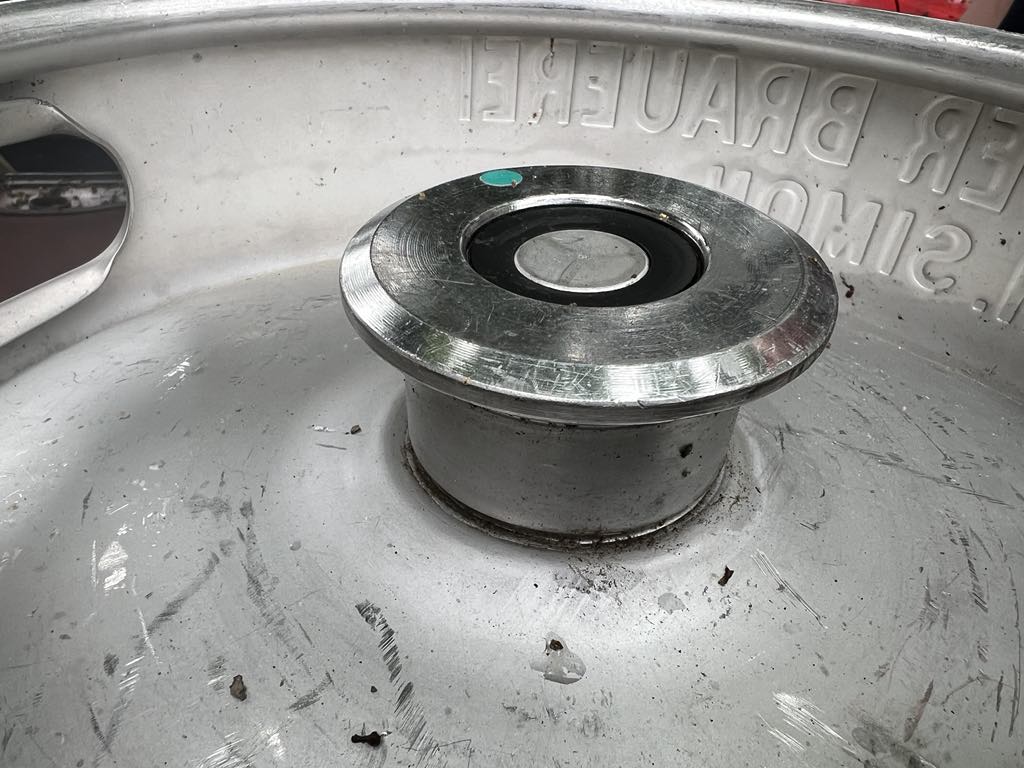
4. Releasing the German-Style Retaining Ring
This is the trickiest part of the whole process and where your screwdrivers are essential. Unlike the spiral rings in many American kegs, German kegs often use a solid, circular clip-style ring that sits in a groove.
- Examine the ring closely. You will find a split or a gap in it. This is your starting point.
- Take your large, sturdy flathead screwdriver and insert the tip into the gap, getting it between the ring and the keg wall.
- Pry the end of the ring upwards and inwards, away from the groove. Your goal is to pop one end of the ring out of its channel.
- Once you have one end free, hold it in place with one hand or wedge the second screwdriver underneath it. Now, work your larger screwdriver around the keg neck under the ring, progressively forcing it out of the groove. It will fight you, but with steady pressure, it will pop free.
5. Gripping and Aligning the Spear for Removal
With the retaining ring gone, the spear is now unlocked, but it won’t just pull straight out. It’s held in place by two metal tabs (lugs) that fit into corresponding notches in the keg’s neck.
- Open your large channel locks and clamp them down TIGHTLY on the top of the spear assembly. This will give you the grip and control you need for the final step.
- Using the channel locks as a handle, begin to turn the spear counter-clockwise. It may be stiff from old gaskets and residue, so you may need to apply significant force.
- As you turn, you will eventually feel the spear “drop” slightly. This is the feeling of the lugs aligning with the removal notches in the keg neck.
- Once the lugs are aligned with the notches, stop turning. The spear is now ready to be pulled straight up and out of the keg.


6. Mission Accomplished: Your Keg is Ready
Congratulations! With the spear assembly fully removed, the most challenging part of your keg conversion is over. You are now left with a high-quality, stainless steel vessel ready for its next life. The next step is to give the inside a thorough cleaning to remove any lingering beer residue before you can begin modifying it for your specific project. You’ve successfully laid the foundation for an excellent DIY build.
Recommended products
-

15 Gallon Keg
$124.99 -

5 Gallon Slim Keg
$74.99 -

7 Gallon Pony Keg
$124.99 -

2″ Single Sided Keg still Gaskets Pack of 3
$8.99